Creating a New Project in ADK

This article will give you introduction about the new project manager in ADK.

Understanding

A typical new Project manager looks like this, (inspired from VS Studio and VTS)

n1

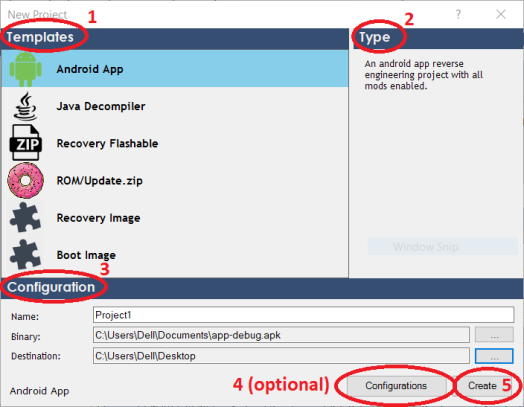
  1. Templates:- This gives the list of project you can work with. You must select one of template to work with.
  • Android App:  A project for reverse engineering Android apps (.apk files), modding, adding resources, theming and advance hooking.
  • Java Decompiler:  A project for viewing the java resource of apk, dex, jar files. No editing is possible in this project. Hence all files are read-only.
  • Recovery Flashable:  A project for creating CWM, TWRP flashable zips.
  • ROM/Update.zip:  A project for ROM modifying or OEMs Update.zip (Note: OEMs zips can only be editing if and only if they are not password protected)
  • Recovery Image:  A project for modifying recovery.img or TWRP recovery image, also contains a useful patch for changing TWRP themes.
  • Boot Image:  A project for modifying boot.img.

Note: Each project type except Java Decompiler contains lots of tweaks, mods for modifying your project. Most of the tweak can be applied from Project > (see options). There are also guides related it, can be found here.

  1. Type:-  Whenever you select any template, its related information can be found in this bar.
  2. Configuration:-  From here you have to set some details for project.
  • Name:  Here, you have to give the name for the project.
  • Binary:  Here, you have to browse for the binary file (from button located in right side). For eg: apk, jar, dex which relates to your project.
  • Destination:  Browse for the folder  where you have to create your project. For eg: When you browse for C:\users\Dell\Desktop, your project will be saved as C:\users\Dell\Desktop\project-name.
  1. Configurations button (Only for Android App Project):-  Here you to set some parameters for Android App during decoding. Once done click Apply.

6

  • Diassemble Resource: This will decompile all XML to proper raw format (classes.dex will remain untouched)
  • Diassemble Source: This will decompile classes.dex to smali folder (resources will remain untouched)
  • Generate Java Source: This will generate java source to the misc folder. This will allows you to compare .java easily (here)
  • Set Debuggable: When checked, you can easily debug your Application in ADK as well in Android Studio
  1. Create:-  This will start the creation of project and will set it as your current one.

Steps to Create

  • In ADK, go to File > New > Project. It will display screen as shown above.
  • Then select one of the template and set configurations for it (explained above)
  • If your project is Android App you can also set some other parameters from the configuration button (explained above). Click on Apply to set it.
  • For Recovery Flashable project there is not binary input.
  • Once done, select create button and your project will be created.

Editing Project

All info about editing and modding project can be found in this list of guides here

What’s in Background?

Whenever you create a project, following files and dirs are created.

Capture

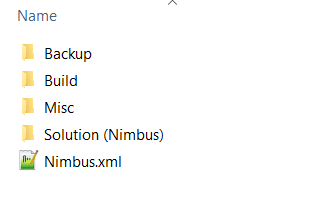
  • Backup:- This folder contains any backup you have set to create.
  • Build:- When you build your project your output file will be created here.
  • Misc:- This folder contains other resources like Java Source, Dexpatcher scripts etc.
  • Solution:- This folder contains all the data of your project that is shown in project viewer screen.
  • XML file:- Each project contains a xml which contains some important information about project. More info here

Snippet Manager

This article will cover on how to use add, create and insert snippets into the file

Understanding

A snippet is a generally a common pasted code which can be reused by others in a project.

const/4 v0, 0x1
const-string v1, "Message"
invoke-static {p0, v1, v0}, Landroid/widget/Toast;->makeText(Landroid/content/Context;Ljava/lang/CharSequence;I)Landroid/widget/Toast;
move-result-object v0
invoke-virtual {v0}, Landroid/widget/Toast;->show()V

For eg: (as above) This is a smali code to display a toast message which can be used as common snippet. All snippets are stored in toolssnippets.xml file. It is read whenever application is started and Snippet Manager is opened, you can also manually edit it.

<?xml version="1.0" encoding="utf-8"?>
<Snippets>
   <Category>
    <Name>dot_os_banner</Name>
    <Type>1</Type>
    <Code>
ui_print("                                               ");
ui_print("***********************************************");
ui_print("            _____     _____    __              ");
ui_print("           |____    / ___   |  |             ");
ui_print("            _     | |   | |                ");
ui_print("           | |   | || |   | |                ");
ui_print("           | |__/ / | |___| |____|  |          ");
ui_print("           |_____/   _____/|______/           ");
ui_print("                 Droid On Time                 ");
ui_print("***********************************************");
ui_print("                                               ");
</Code>
  </Category>
</Snippets>

Above is an example of snippets.xml. Name is where the snippet name will exist, no two snippet can have same names, Type (generally 1,2 or 3) represents for which type of file the snippets are! For eg: Type 1 means for Updater-Script, Type 2 means for Smali, Type 3 is for all types of file irrespective of its extension. Code is where you actual snippet will present.

You can manually create your own snippet and append to this file or use built-in snippet manager to create one.

Creating Snippets

In ADK, go to Edit > Snippet Manager (or press Alt + Q) to open snippet manager. Now from above go to the tab says Create. Here you can create your snippet.

From bottom, you have to set come params.

Language: This is change the language of textbox (above) for proper syntax highlighting (nothing to do with code).

Name: You must mention a name for snippet. This will be the text for snippet item.

Type: As mentioned earlier, you have to select from this drop down box.

Export to Xml: This will export current document as XML file, you can then add or merge it (How? discussed below). You can also share this with any ADK user. Inshort, this will create a standalone snippet file.

Merge with exisiting Snippets: This will merge the snippet and append the document to toolssnippets.xml. No need to add or merge it again, this will automatically do it. This will not create standalone snippet file.

You can also do one thing to easily create a snippet. Just select a text in editor and right click, you will see a new option “Create a snippet”. When you click on it, you have to first specify the name for snippet and it will create same window like above.

Adding/Managing Snippets

As said earlier all snippets are stored in toolssnippets.xml. You can easily manage it from snippet manager itself.

So open snippet manager, you will get something like below.

On right side you will see your snippet file text. On left side is the list of snippets name stored in snippets.xml.

Add/Merge: This will add and merge a standalone snippet xml to your snippets.xml.

Delete: This will remove any selected snippets from left side.

Note: All changes are invoke only when this above form is close. Also making any changes to “Code” doesn’t affect snippets.xml, it will only depends on the snippets item (shown on left side). If you want to save changes to “Code” just click Export button to create standalone snippet and the add/merge it. Also, you cannot edit existing snippet within this editor; you must delete and recreate new one.

A tip, you can hover mouse on snippets item to see their codes.

Inserting Snippets

It is very easy, you just need to remember this things.

Type 1 (update-script) snippets will be added to Project > Add Templates with Text as the snippet name.

Type 2 (smali) snippets will be added to Project > Smali Insert with Text as the snippet name.

Type 3 (custom) snippets will be added to Project > Insert Snippets with Text as the snippet name.

You can then select the snippet item which will insert the snippet to current line position.

PRO TIP

To insert type 3 snippet you can also Press CTRL + SHIFT + I  to show a dialog like below then use arrow keys to select the snippet and press enter to insert it. You can also cancel it by pressing ESCAPE  button on keyboard.

A general workaround is shown below!

Design a site like this with WordPress.com
Get started