Debugging app precisely

ADK debug tool, has improved a lot over few versions, each upgrade meant to be suitable as per developers. Now I can say it’s perfect for debugging android app. 

Since android 7.0 google has provided a way to capture app logs through its pid (Process Id)! With it we can get in-app logs i.e log created using Log.i, Log.e in code (native). So using same approach as android studio does here is the implementation.

Note: On older phones there is new method of getting logs in ADK, so you still get those in-app logs.

Working Through

For testing purpose we are going to use this sample app which is written in Java. Compile the project and install it on your phone! The app looks like as shown in below image (containing two buttons)

log2

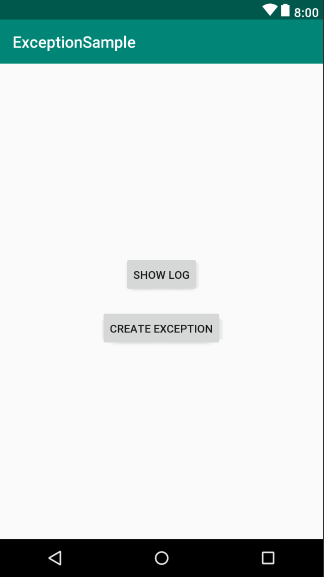
By clicking on Show LOG button generates Log.i , Log.d, Log.w & Log.e messages and Create Exception button will throw an exception and will show its stack trace.

  • In ADK, go to Debug > Custom Package (make sure app is installed). You will get a dialog as shown to choose your device!

log3

  • Select your device and you will be shown a new dialog will all available installed packages on your device. From here select package com.kpstv.exceptionsample. You can also use filter box to shorten your search list.

log4

  • Now click OK and wait till ADK automatically launches app and attach it the process. Once app is loaded click on both of button to see what happens!

log1

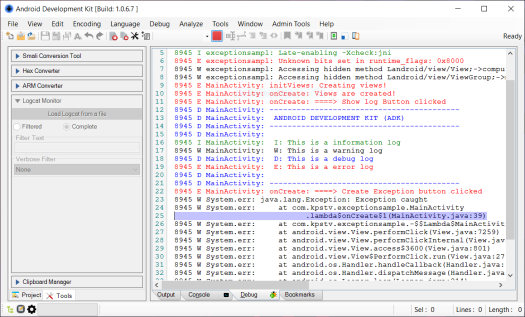
You will see perfect log representation as shown. If you are familiar with android studio logging tool you will definitely find this useful. Also check the code of the sample app (given above) to check where logs are implemented!

Note: To stop logging click on Red stop button as shown above to stop capturing logs.

v1.0.6.8+

Detect Partition Layout

So this is a small option which let’s you detect partitions of your Android device (with or without root) or from a recovery image.

Sometimes, when we are modifying updater-script adding commands for mounting, extracting images to block we require a partition table which helps us to identify it. So here we go!

Working Through

Tool detects parition from your current ROM project, recovery image or connected Android device.

  • In ADK, select Tools > Android Image Tool > Detect Parition layout.
  • Choose required option as displayed in message box.
  • Once done, a new window will pop up displaying your paritions.

b2

Note:

  • Even if you close the dialog box the current partition table is saved for re-use. To properly close (exit) it. Select File > Dispose Info (exit) option
  • Export to json option will create a json file. You can place this file within your ROM project > Misc folder > partition.json file. By doing this ADK will use paths from the file. (By default it is auto-generated during every ROM project creation)

Boot Signer Tool

So here is basic theory explaining why we need this tool! Basically we all know about OTAs and also what is stock ROM. If you noticed mostly in every stock ROM there should a file named boot-verified.img or recovery-verfied.img along with boot and recovery image. WHY? 

 Well, verified images are those matching original signature of device which allows flashing of images even if bootloader are locked. This same concept is used in OTAs, basically they are OEM (signed) images that’s why they can be flashed. 

But suppose we modify a boot image and try to flash the image in locked bootloader, it won’t work b’coz original signature are not matching. So referring to chainfire’s work of signing images which he calls AVB, I created this tool which does this task in simplier way.

Note: This method does not work all the time. PS: Even Magisk does this when you create a patch boot image within Manager app.

Working Through

  • In ADK, select Tools > Boot Signer Tool.

b1

  • Set your input boot image and out path.
  • Now you need to browse for key.x509.pem (i.e your device signature file), usually they can be found within /etc/security/otacerts.zip. If you don’t have it or want to pull it out from device select the desired option.
  • Now hit OK to start the process, ADK will notify you once it’s done. Now you can try flashing the image in locked boot loader.


Modifying ROM installer

Well we see from Android 9 it is difficult to modify a compiled ROM as newly generated .dat and .br file doesn’t flash in TWRP. Why? This is due to transfer.list as it couldn’t identify proper blocks for respective commands (problem for Android 10)

Solution? Well In ADK there is a method to migrate the installer to standard installer which contains system, vendor folder with a proper updater-script file.

Note: This doesn’t mean that stock installer in Android 9 ADK generates is broken, it works just fine but you know takes a lot of time to generate.

Difference

(Normal installer we see in ROMs nowadays…)

beforeM

(After Migrating)

afterM

Migrated ROM’s updater-script contains proper symlinks and metadata permissions (an improvement over Assayad’s Kitchen)

Working Through

  • In ADK, create a normal ROM project.
  • Now go to Project > Migrate to basic installer…

m2

  • This will not take much time, once done ADK will notify you!
v1.0.6.7+

Sign project with Device keys

So this is  a requested feature, which will help you to sign your apk, ROM, Flashable zip project with device signature keys.

What’s Use? Well there is a small concept regarding this. If you aware of OTAs you might know its a flashable zip, but not just an ordinary zip it is signed with the original device signature which helps to identify the proper target and flash it. This is one of the reason stock recovery can flash this zip. 

So signing zip with device signature can help you flash zip using stock recovery which eliminates the need of flashing custom recovery.

Working Through

  • So in ADK, open a APK, ROM, Flashable project (it’s optional to open a project).
  • Now go to Tools > Sign Tool.
  • From there browse for your File which you want to sign and set the output path as well.

p2

  • Now from drop down box select Sign with device generic keys. Note, you need to connect your device for this process (root is not needed).
  • Finally Click on OK and select your device from the list.

p3

  • Once done, ADK will notify you the result.
Design a site like this with WordPress.com
Get started